We can only pre-order the Samsung Galaxy Nexus from the UK and it has already been rooted on Android 4.0 Ice Cream Sandwich! Talk about fast! It seems that the developers over atMoDaCo have been swift on their feet getting this task taken care of so you can fully enjoy every nook and cranny of your new device using their Superboot.

What’s even better is, these guys have made it so easy that it is almost fool-proof. There’s no need to mess with ADB or create any funky partitions or even create or change any of thesystem files or folders manually. It even keeps your factory ROM settings and does not over-write anything.
What the process does give you is complete root access along with theSuperuser app installed on your device. The way it works is like this; during the process yourphone will boot using a boot image that handles all of the modifications. Here’s how to do it:Step 2: Extract the .zip file to a directory (7-zip is a tool we highly recommend in doing so), its best you place the unzipped file directory on your desktop for easy access.
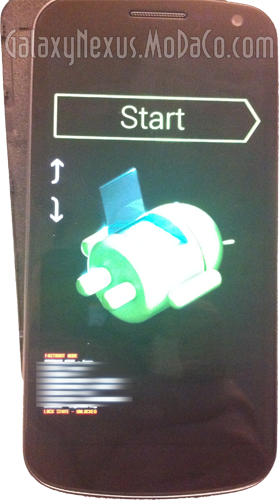
Step 3: At this point you will want to put your device into ‘bootloader mode.’ To do this you must turn off your Galaxy Nexus completely and power it back on while holding down theVolume up + Volume Down key at the same time. Once you’re in bootloader mode, you’ll be greeted with a screen as shown below:

Windows
On Windows, with your device plugged in to your PC, double click install-superboot-windows.batfile, that’s it.
Mac
On Mac, you will need to run terminal and execute the following from the directory location:
chmod +x install-superboot-mac.sh
./install-superboot-mac.sh
Linux
On Linux, you will need to run terminal from the directory containing the files you unzipped, and punch in the following lines:
chmod +x install-superboot-linux.sh
./install-superboot-linux.sh
If you performed the above steps correctly, you will have complete root access to your Galaxy Nexus, and you’re ready to install apps or tweaks which are otherwise not allowed by Google to be executed on said device.
One thing that must be noted, this does require that your bootloader be unlocked. If you are using a retail version of the aforementioned device, the following command will unlock the device:
./fastboot-windows oem unlock
I know we all are waiting to get our grubby little fingers on one of these new Ice Cream Sandwich devices and I hope you will turn to us and use this guide to help you root the Galaxy Nexus. We are all excited to see what Google’s new Flagship phone brings us and what will be developed for it specifically. We will keep you all posted on any more developments on the device and what you should expect from it.
